Images
Pylinac deals nearly exclusively with DICOM image data. Film has been actively avoided where possible because of 1) the increased use and technological advances of EPIDs. EPID data also contains useful tags that give contextual information about the acquisition (unless you use Elekta). And 2) film images tend to be much messier in general; they often have markings on them such as a pin prick, marker writing to identify the image, or flash on the edges of the image where the scanner and film edge did not line up. That being said, pylinac can generally handle DICOM images and general images (PNG, JPG, etc) relatively well.
The image module within pylinac is quite powerful and flexible to do arbitrary operations
for use in custom algorithms. For example, images can be loaded easily, filters applied, cropped,
rotated, and more with straightforward methods.
How data is loaded
Pylinac uses the excellent pydicom library to load DICOM images. The pydicom dataset is stored in pylinac images
under the metadata attribute.
For non-DICOM images (JPG, PNG, TIFF, etc), the Pillow library is used.
To load an image, the easiest way is like so:
from pylinac import image

my_dcm = image.load("path/to/my/image.dcm")
my_dcm.metadata.GantryAngle  # the GantryAngle tag of the DICOM file
# these won't have the metadata property as they aren't DICOM
my_tiff = image.load("path/to/my/image.tiff")
my_jpg = image.load("path/to/my/image.jpg")
See the load() function for details. This will return an image-like
object ready for plotting or manipulation. Note that XIM images are handled separately.
We can also test whether a file is image-like without causing an error if it’s not:
from pylinac import image

is_image = image.is_image("path/to/questionable.file")  # True or False
Coordinate System
Note
Do not confuse this with linac coordinate systems, aka “machine scales”, which are different. See Machine Scale.
Images in pylinac are oriented in “image” or “screen” coordinates. This means that the origin (0, 0) is at the top-left corner of the image, with the x-axis increasing to the right and the y-axis increasing downwards. This is also how DICOM images are oriented, so pylinac images are consistent with DICOM standards.
This is in contrast to “Cartesian” coordinates, where the origin is at the bottom-left corner of the image, and +x is to the right while +y is up.
Using right-hand rule conventions, positive angle is clockwise. Aka “x goes to y”.
Warning
This can sometimes be confusing when dealing with the y-axis, as what is viewed as the “top” of the image has the lowest y index values.
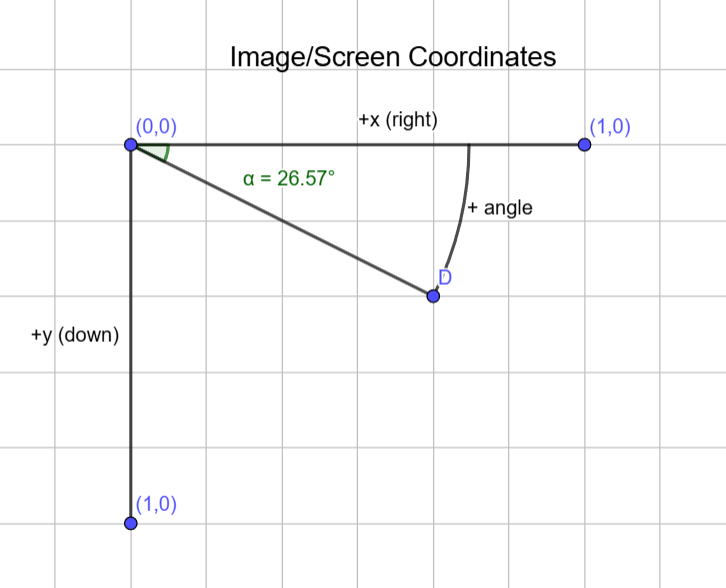
This can also be visualized here.
Image Manipulation
To manipulate an image, such as cropping, simply run the method. Some examples:
from pylinac import image

my_dcm = image.load(...)
my_dcm.filter(size=0.01, kind="median")
my_dcm.fliplr()  # flip the image left-right
my_dcm.ground()  # set minimum value to 0; useful for images with short dynamic range
my_dcm.crop(pixels=30, edges=("top", "left"))
my_dcm.normalize()  # normalize values to 1.0
my_dcm.rot90(n=1)  # rotate the image by 90 degrees
my_dcm.bit_invert()  # flip the image so that dark is light and light is dark. Useful for EPID images.
my_dcm.plot()  # plot the image for visualization
These and similar methods are available to all types of images. However, some image types have additional properties and methods. For a DICOM that is from a linac EPID, we have a few extras. We need to load it specifically:
from pylinac import image

my_linac_dcm = image.LinacDicomImage("path/to/image.dcm")
my_linac_dcm.cax()  # a Point instance. E.g. (x=550, y=550)
my_linac_dcm.dpmm()  # the dots/mm at isocenter. Will account for the SID.
TIFF to DICOM
Pylinac will often internally convert TIFF images to pseudo-DICOM files so that the same methods are available as a DICOM. To do so:
from pylinac import image

image.tiff_to_dicom(
    tiff_file="path/to/image.tiff",
    dicom_file="my_new_dicom.dcm",
    sid=1000,
    gantry=0,
    coll=0,
    couch=0,
    dpi=280,
)
We will now have a file in our working directory named my_new_dicom.dcm that is, for all intents and purposes,
a DICOM file. It can be loaded with image.load() or pydicom like any normal DICOM.
RAW Images (CyberKnife, VisionRT)
Pylinac can open .raw images generated from CyberKnife and VisionRT images. These are usually .raw files that follow simple metadata+pixel information format.
There are 3 functions available: load_raw(), load_raw_cyberknife(), and load_raw_visionrt().
The first is a general function that can open any .raw file. The latter two are specialized for CyberKnife and VisionRT images, respectively and use the general function.
These will generate an ArrayImage object that can be manipulated like any other image.
To open these VisionRT:
from pylinac import image

my_raw = image.load_raw_visionrt("path/to/my/image.raw", shape=(600, 960))
# OR
my_raw = image.load_raw("path/to/my/image.raw", shape=(600, 960), dtype=np.uint32)
To load CyberKnife images:
from pylinac import image

my_raw = image.load_raw_cyberknife("path/to/my/image.raw", shape=(512, 512))
# OR
my_raw = image.load_raw("path/to/my/image.raw", shape=(512, 512), dtype=np.uint16)
Gamma
We can compute the gamma between two arrays or images using gamma_2d():
import matplotlib.pyplot as plt
from pylinac import image

ref = image.load("reference_dicom.dcm")
eval = image.load("eval_dicom.dcm")

gamma = image.gamma_2d(
    reference=ref,
    evaluation=eval,
    dose_to_agreement=2,
    distance_to_agreement=3,
    global_dose=True,
    ...,
)

# gamma is a numpy array the same size as the reference/eval image
plt.imshow(gamma)
Pixel Data Rescaling
In DICOM the pixel data is stored as a data stream and needs to be converted into meaningful values — commonly referred to as modality-specific units (e.g., Hounsfield Units in CT). This is done by applying a lookup table or a linear transformation (e.g. \(P_{corrected} = Slope * P_{raw} + Intercept\)). Both cases are handled by pydicom.pixels.apply_rescale.
Note
This behavior can be overridden by setting the raw_pixels parameter to True:
from pylinac.core import image

dcm = image.load("my_dcm_file.dcm")                    # Default, returns rescaled data
dcm = image.load("my_dcm_file.dcm", raw_pixels=False)  # Same as default
dcm = image.load("my_dcm_file.dcm", raw_pixels=True)   # Override, returns raw pixel data
Added in version 3.13.
Pixel Data Inversion
Note
In this context inversion means flipping the min/max values.
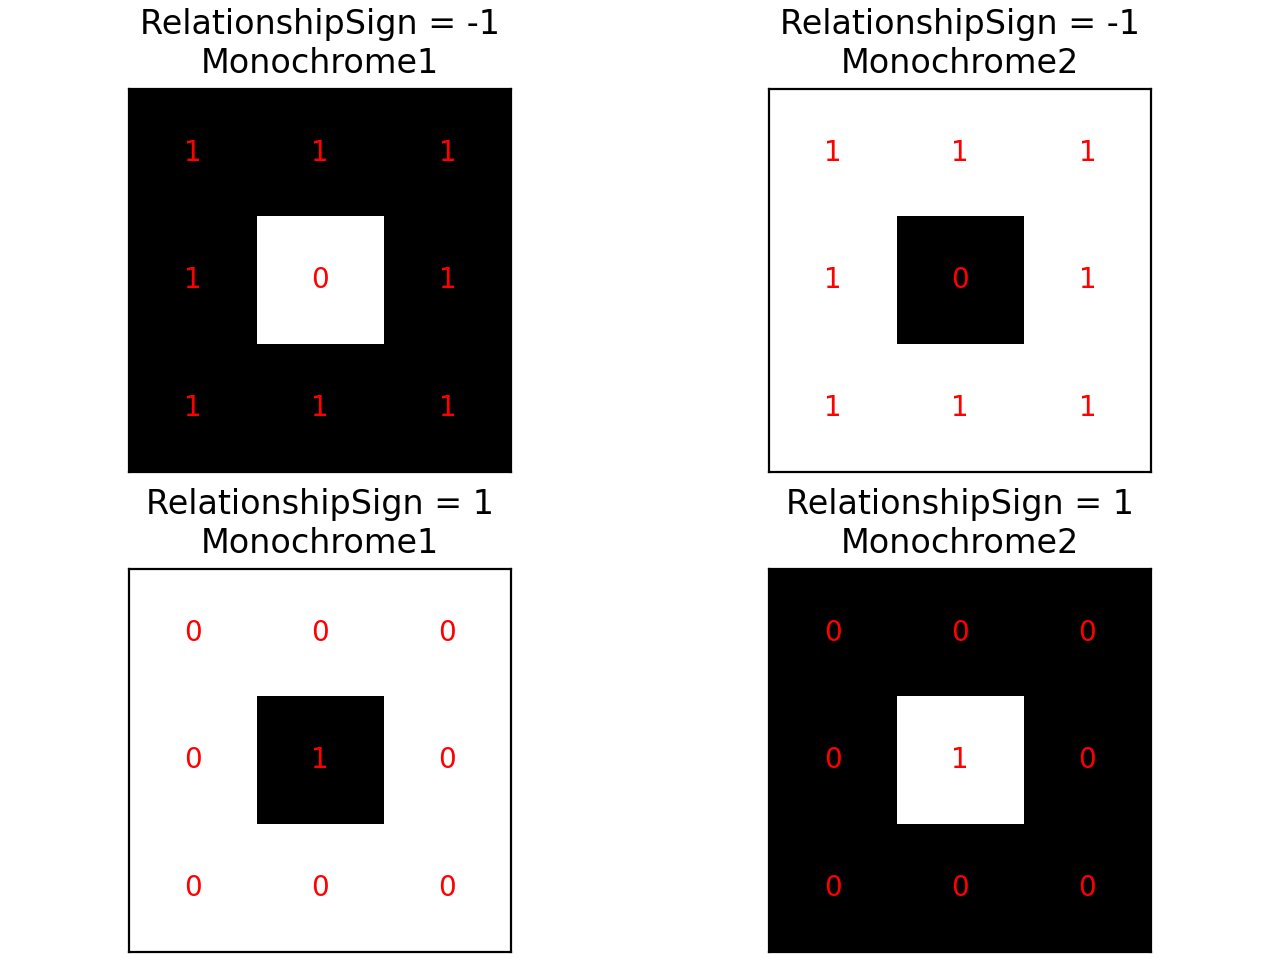
DICOM provides different tags to handle how an image should be displayed with respect to light/dark values and low/high intensity values.
- PixelIntensityRelationshipSign (0028,1041)
- The sign of the relationship between the Pixel sample values stored in Pixel Data and the X-Ray beam intensity:+1: Lower pixel values correspond to less X-Ray beam intensity-1: Higher pixel values correspond to less X-Ray beam intensity
- PhotometricInterpretation (0028,0004)
- Specifies the intended interpretation of the pixel data:MONOCHROME1: …The minimum sample value is intended to be displayed as white…MONOCHROME2: …The minimum sample value is intended to be displayed as black…
Note
The axiom for pylinac (for v3.0+) is that higher pixel values == more radiation == lighter/whiter display, i.e. we follow MONOCHROME2 and invert if PixelIntensityRelationshipSign=-1
This is the most common issue when dealing with image analysis. E.g. when displaying a square field (x-rays in the middle, no irradiation on the sides) we can have these combinations:
(Source code, png, hires.png, pdf)
As a convention pylinac uses MONOCHROME2 to display the images (regardless of the PhotometricInterpretation value).
Typically film images have negative PixelIntensityRelationshipSign, whereas EPID images have positive PixelIntensityRelationshipSign.
Since most RT images these days are EPID images, pylinac processes images as EPID therefore the pixels are inverted when
PixelIntensityRelationshipSign = -1:
Note
This behavior can be overridden by setting the invert_pixels parameter to False, True, None (auto):
from pylinac.core import image

dcm = image.load("my_dcm_file.dcm")                       # Default, returns inverted pixels if PixelIntensityRelationshipSign = -1
dcm = image.load("my_dcm_file.dcm", invert_pixels=None)   # Same as default
dcm = image.load("my_dcm_file.dcm", invert_pixels=True)   # Force inversion, returns inverted pixels
dcm = image.load("my_dcm_file.dcm", invert_pixels=False)  # Do not invert, returns original pixels
Added in version 3.35.